Creating Your Third Part: the Gage Block Assembly
We will now assemble a set of pre-made parts. The end-goal is a mount for a gage block that is adjustable in two axes.
Before we begin, you’ll need to copy several files to your working directory;
- gage_mount_back.prt.1
- gage_mount_front.prt.1
- knob_1inch.prt.1
- bearing_187_.prt.1
- bearing_250.prt.1
- del.prt.1
Rather than create a new part, we will generate an assembly. File/New/Assembly and name it something apt; gage_assem, something akin to that. To import a new component, Component/Assemble and choose the correct part. We’ll begin with gage_mount_back.
The part will be placed and a screen will open, asking for constraints and giving the option to specify connections.
First we need to be able to see a few things in the model tree. View/ModelTreeSetup/ItemDisplay and make sure that Features is checked. Rather than just list bulk components in the tree, this will also place specific features of each and every part. This should make alignment and a few other routine tasks much easier.
Before going further, play with the model. Become familiar with what it looks like with and without its surfaces shaded, with and without datum planes, axes and points. Note that there are three datum present that are not attached to the gage_back at all; these are part of the assembly and construe its reference frame.
At this point, if you would like to align the first component to these datum in some manner, feel free to experiment. If you get lost within constraints or become frustrated, simply cancel and re-add the part; when the program seems to illogically find two perfectly agreeable constraints conflicting, this might be a good fix. I did find it unnecessary to place the first part, when first creating this object in the design phase. All of my parts referenced off of each other, therefore there was no need for outside references. In any case, The move tab of the component placement dialog box can be frustrating but will allow you to adjust the location of the part if you need it in a certain place before inflicting the part with a constraint.
 One note; in the Component Placement dialog box, there
is a button for “Connections.” This
opens a completely different set of qualifications for the part placement. They function in a fundamentally different
way; they are purposefully
under-constrained such that a part can be driven by other parts to be added
later.
Once you’ve finished exploring the features and buttons available, click ok to place the part.
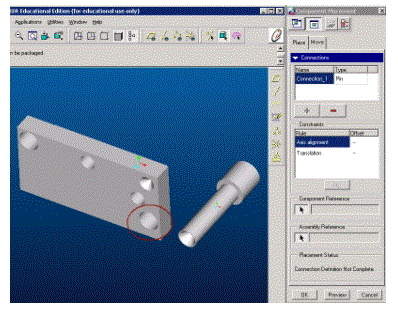
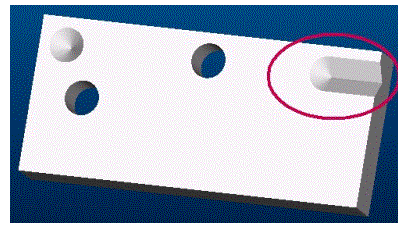
Now we’ll add the fine-adjustment screws. Component/Assemble. Choose the part “knob_1inch.prt.” Open the Connections area of the component placement dialog box. Your screen should vaguely resemble the picture on the right.
We need to change the connection type from pin to slider.
Make sure datum axes are visible. For
the axis alignment rule, choose the axis running down the length of the knob
and the axis along the hole circled in red in the screenshot on the 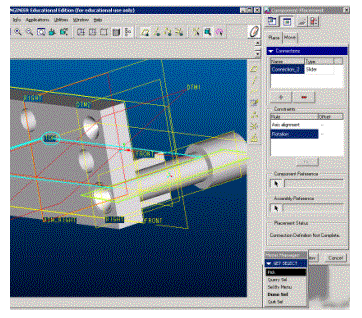 right. It will now need the rotation rule
references specified; these can be
slightly odd to understand at first. My
suggestion is to use the top datum plane from the knob and from the gage_back
(I’ve attempted to highlight these in teal and green), or the front datum from
both. It will be MUCH easier to select
the correct datum (as you can see on the left, datum planes become very, very
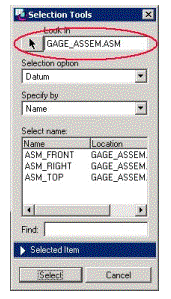
noisy when too many are in a tight space) if you use the SelectByMenu feature. To do this, first click on SelByMenu. This should bring up the picture on the
right. Click on the arrow in the red
oval. Now click on the part you would
like to select a feature of. The selection
option lets you choose what type of feature;
in this case we want to choose the datum option. From there, on either part, we want to
choose the top datum. Once you’ve
highlighted the correct datum, click on select. Now choose the other reference; the top datum from the other
part. Another method for selecting the
top datum from the gage_back would be to use the model tree on the left as
we’ve set it to display all features.
 Once the Component
Placement dialog says “connection definition complete,” click Ok and the part will be placed. At this point, with no serious annoyance, it
would be possible to open the mechanism option from the top level of the menu
manager and drag the knob back and forth.
This would provide little interest though.
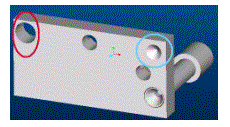
Place another identical know along the hole highlighted in red on the left. Use the same procedure.
Our next component is the pivot-bearing that will be set in the conical notch highlighted in blue on the left.
 Component/Assemble
and choose bearing_250. My
first suggestion would be to place the ball close to the notch using the
translation feature under the move tab.
However, this isn’t necessary.
When ready, open the connections portion of the dialog. This time our type will be “ball.” Above the notch should be a point which
corresponds to the correct distance from the part itself. Align the point in the center of the ball
(PNT0) with this point.
Next we need to place bearings in the ends of our adjustment knobs. This is the exact same procedure, though using the 187_ bearing instead of the 250 bearing. Be wary; the 187_ bearing has a large number of datum defined and is extremely confusing when trying to decipher which part of which datum is where. It is helpful to select one datum and then rotate, as the selected datum will stay highlighted through the rotation.
 The next component can be quite
tricky. We’ll first need to open it and
add a few features. File/Open and
choose gage_mount_front. What we
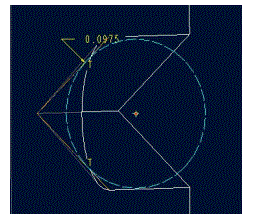
need to do is first define two datum points via sketching that are the correct
distance from the walls of the notch outlined in red on the screenshot to the
right. Insert/Datum/Point and choose
sketch. The correct plane is DTM2,
as this corresponds to the center of the conical portion of the notch
  and the end of the
linearly-invariant portion. Personally
I would prefer to use the A_2 axis rather than the top datum plane as a
reference, but the choice is yours. Generate
a construction circle using the
 ![]() button.
Place its center well above the desired location in the notch. First draw it approximately and then specify
its radius which should be .0975” or its diameter should be .187”. Now use constraints to make the circle
tangent to the edges. It will
probably ask you to remove one of the constraints if you desire two tangent
points; personally I would discard
the point-on-entity designation that locks it to the A_2 axis. Once this circle is created, make a
single point coincident with its center;
this will be the datum point created as a result of this sketch. Your sketch should look something like that
on the left. Click the checkmark and
then ok. Repeat this procedure
for the other end of the notch, only this time use the surface of the
end of the part as the sketching plane.
You’ll be required to use the top datum plane as a reference; this is
not a problem.
button.
Place its center well above the desired location in the notch. First draw it approximately and then specify
its radius which should be .0975” or its diameter should be .187”. Now use constraints to make the circle
tangent to the edges. It will
probably ask you to remove one of the constraints if you desire two tangent
points; personally I would discard
the point-on-entity designation that locks it to the A_2 axis. Once this circle is created, make a
single point coincident with its center;
this will be the datum point created as a result of this sketch. Your sketch should look something like that
on the left. Click the checkmark and
then ok. Repeat this procedure
for the other end of the notch, only this time use the surface of the
end of the part as the sketching plane.
You’ll be required to use the top datum plane as a reference; this is
not a problem.
Once those two points have been generated, Insert/Datum/Curve/ThruPoints/Done. Select the two points you’ve just created and click done/done/Ok.
Now that the gage_mount_front has been modified, we’re ready to return to the assembly. First save this file. You may want to File/Delete/OldVersions, as ProE retains many different versions of the same file. It always works off of the newest version, but maintaining old versions can consume disk space.
Once it’s been saved, close the window and return to the assembly window. If it is not marked as active in the title bar or the taskbar, Ctrl-A will make it active. This is also a useful tip for when the Menu Manager starts misbehaving or gets lost.
Component/Assemble and choose the newly modified gage_mount_front.
You may want to begin by rotating and translating the component to roughly the correct position. If you do not, it may orient the parts in truly bizarre manners, with pieces overlapping in the most idiotic of places.
Open the connections tab and begin with a ball connection
from the point above the conical notch 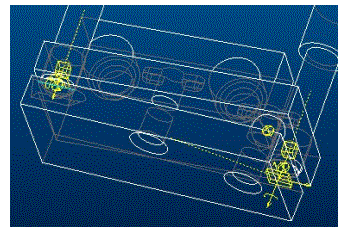 (PNT7) to PNT0 in the
middle of the bearing_250 part.
This will be its main pivot. Add
another connection using the green plus sign; if that sign is not available, the previous connection was not
valid and it will not let you continue.
The _187 bearing we will now attach is the one closest to the _250
bearing. Here forwards I will refer
to this as the “near” knob. This connection
type should be planar. The component
reference should be the side of the gage_front with notches in it. The assembly reference should be one of the
datum planes tangent to the bearing;
DTM3 will suffice. These two
are the only necessary connections so far.
Click ok to place the part.
To connect the third bearing we will need to enter the mechanism section of the menu manager. Mechanism/Model/Slots. Click Add. The follower point will be PNT0 in the center of the _187 bearing. The slot curve is that which we drew on the gage_front a few moments ago. The slot endpoints are those two points you created in order to define the curve. Once all are specified, click ok and close. Hopefully it should look something like the screenshot to the right.
The small yellow objects have to do with degrees of freedom
and axes of directed motion. I find
they are more of a hindrance than anything, as they seem to require an
extravagant amount of redraw time. ![]() will allow you to turn off all of them.
will allow you to turn off all of them.
One final constraint is required for the system to behave reasonably. Right-click-and-hold on the gage_back. It should give a menu with the option to Fix Location. Do so.
At this point, the assembly is completely connected; to move the knobs, from the menu manager
click Mechanism/Drag. The very first
thing you should do is click ![]() ;
this will take a “picture” of the orientation and sub-constraints
internal to the drag-dialog box (accessible by the constraints tab in this
dialog box, oddly enough.) If the
assembly becomes radically out of line (as they are prone to do) clicking on
the name of the snapshot will load all of the positions. A warning;
if a snapshot is very old and the model has changed significantly, be
wary of clicking on it. At the very
least exit and save the entire assembly before trying to open the shot; I’ve had the program crash many times trying
to load a snapshot that cannot be reasonably applied to the model.
;
this will take a “picture” of the orientation and sub-constraints
internal to the drag-dialog box (accessible by the constraints tab in this
dialog box, oddly enough.) If the
assembly becomes radically out of line (as they are prone to do) clicking on
the name of the snapshot will load all of the positions. A warning;
if a snapshot is very old and the model has changed significantly, be
wary of clicking on it. At the very
least exit and save the entire assembly before trying to open the shot; I’ve had the program crash many times trying
to load a snapshot that cannot be reasonably applied to the model.
To drag a moving component, click on ![]() and then grab the section of the part you
wish to move. I would recommend only
dragging the knobs. Other parts may act
erratically if you attempt to drag them.
and then grab the section of the part you
wish to move. I would recommend only
dragging the knobs. Other parts may act
erratically if you attempt to drag them.
Once you’ve got the feel of how the system works, move to
the constraint tab. It would be
nice if the front surface of gage_front were parallel to the “front” surface of
the gage_back. Click on ![]() and then select both surfaces. This will orient them and keep them
there. Now try switching to the
snapshots tab and moving it. Take a
snapshot while there and rename it “plane_parallel.” Go back to the constraints tab, select the
“plane-plane orient” that we just created and click on
and then select both surfaces. This will orient them and keep them
there. Now try switching to the
snapshots tab and moving it. Take a
snapshot while there and rename it “plane_parallel.” Go back to the constraints tab, select the
“plane-plane orient” that we just created and click on ![]() to turn it off. Go back to snapshots and now try dragging the parts. There are several other orientation
constraints available; we will use these later when assembling all of the
mounts, parts, stages and components. Make
sure when exiting that the planes are parallel; do this by loading the
snapshot.
to turn it off. Go back to snapshots and now try dragging the parts. There are several other orientation
constraints available; we will use these later when assembling all of the
mounts, parts, stages and components. Make
sure when exiting that the planes are parallel; do this by loading the
snapshot.
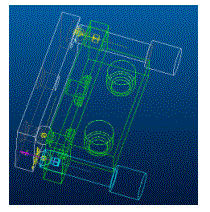
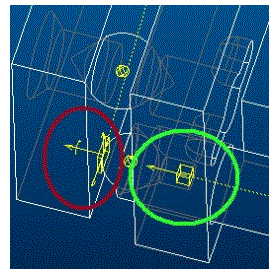
Exit the drag option but stay in the mechanism menu. Model/Drivers. Click Add. Now the yellow figures are crucially important. Zoom in on the near knob. There are two joint axes defined here; one from the slider connection that keeps the knob aligned with the hole (circled in green), another that allows the ball to drive the planar surface of the gage_front (circled in red). For the first driver (Name it single_point as it contacts at only one point) the joint axis we desire as a driven entity is the one holding the knob in place(the one in green). If the correct axis has been selected, it will then highlight the two objects as shown on the right; gage_back will be green and the near knob will be in cyan. Click on the Profile tab.
Our first task is to set the references to determine the
magnitude of displacement between the green and cyan 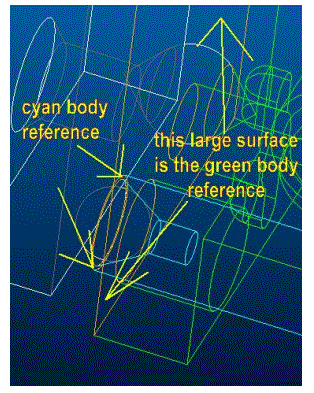 bodies. Click on Set Zero. In the Set User References section make
sure By Reference is checked. Then
for the cyan body reference, choose the end of the knob on the ball-end. For the green reference, choose the plane
facing the notched side of gage_front.
Now check the limits option under joint axis limits. The minimum should be –0.5 and the max
should be 0.5 Click ok and you should
be returned to the driver editor.
The Magnitude section determines the type of equation that
will be used to drive the cyan body (as a function of time elapsed in the
motion run) and allows you to specify constants. The type of equation we’d like is a cosine function; we’d like to move the knob forwards and
backwards, returning it to its original position. If you allow the cursor to hover over the “cosine” label, in the
bottom left corner of the main active window you should see a description of
what the equation is. From this it
isn’t very difficult to determine constants for this. Our goal is a “cosine” function that starts at zero, goes to some
max, goes through zero, goes to some min and returns again to zero. We want this to occur within the first 2.5
seconds of the run; our run will be 5
seconds long and we want the near knob to oscillate in the first half and the
far knob to oscillate in the second half.
Constants for the equation are as follows; A=0.2, B=270 (as this value is in degrees), C=0.0705, T=2.5. The “C” constant is pulled from a reading in
the “Set Zero” screen; we’d like this
to begin with gage_front & _back parallel.
From the drag-constraint earlier, they were set so they were
parallel. The Set Zero screen read off
the value of displacement and that is what is substituted in for C. Click Ok.
Move over to the other knob and define it’s driver in a
similar manner; however, this time name
it two_point. Note that in the
SetZero window there is a different displacement. It should be roughly 0.126.
That will be C in the control equation for this driver. Once the second driver is defined, click
ok and click close in the Driver window.
Click Done to return to the mechanism main menu.
We will now create a motion run; an animation of parts. Click
Run Motion and then Add. Name it
whatever you like. Change EndTime to
5.00 as we only want this to last 5 seconds. Change the initial
configuration to be a snapshot; specifically the one you took after aligning
the gage_front & _back. Now click
on Driver. Both should already be added;
however we do not want both to use the start and end time. For the two_ point, change it so that it
does not use “Time Domain Start.”
Change its start time to 2.5.
Likewise on the other, change it so that it does not use the
TimeDomainEnd, but instead 2.5. Click
ok. Select the motion definition and
click run. It should animate the object
now. Close the RunMotion dialog box.
There should be a “Play” button on the taskbar (![]() ); click it.
Click the Play option in the ResultsPlayback dialog box.
); click it.
Click the Play option in the ResultsPlayback dialog box.
Now click capture.
Give it a reasonable image size, as the initial resolution is so high that it might take the computer several long minutes to generate the MPEG file. 320x240 is sufficient. Click ok and it will then capture the frames and output in your working directory an MPEG for which you supplied the name. The MPEG as created by the author is here (~227 KB).
It is not necessary to save motion results.
Save the assembly; it is complete.
The assembly as created by the author is here (~50 KB).
David Sproles, 2002-08-06