Creating Your Second Part: the Hypotenuse
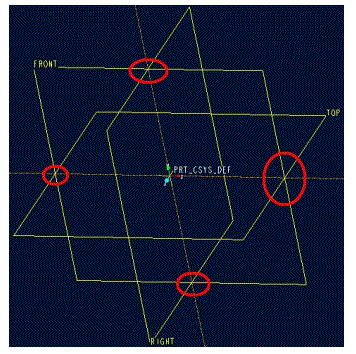
We shall begin with by attempting to conquer the rebellious sketcher. Frustratingly enough, controlling the way the sketcher orients itself is not possible when selecting the sketching view (i.e. horizontal and vertical references). In order to combat this annoying violence on the part of the authors, one must unfortunately learn to read the datum planes without any references. Once in sketcher mode, however, this is significantly easier.
First we want to make sure it is possible to see the spin center. Without these, it is impossible to rotate the object and know what is going on, as we’ve nothing other than datum planes. Utilities/Environment then make sure Spin Center is checked. Apply/Ok.
 From the menu manager we will create the basic
shape of our part. Feature/Create/Protrusion/Extrude/Done/BothSides/Done. Select the Front datum as our sketching
plane and click okay. Here’s the
frustratingly section. Simply choose
Default as our Sketching View, as we’ll orient the planes and axes manually.
From the menu manager we will create the basic
shape of our part. Feature/Create/Protrusion/Extrude/Done/BothSides/Done. Select the Front datum as our sketching
plane and click okay. Here’s the
frustratingly section. Simply choose
Default as our Sketching View, as we’ll orient the planes and axes manually.
Note on the drawing to the right the red circled areas. These intersect the front plane and top or
right planes. Hopefully this should
allow you to get a feel for the 3D shape of the planes and their
orientation. Noting the spin center and
which color corresponds to which plane, attempt to 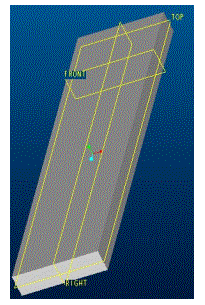 orient the datum planes so that the yellow
(positive?) side of the top plane is facing upwards on the screen and the
yellow side of the right plane is facing the right side of the screen. This will allow us easier use of the datum
planes when assembling, orienting or manipulating this part. While this may not be necessary for some
parts, it may be incredibly useful later on when assembling components as one
tries to figure out which datum is which and belongs to which part.
orient the datum planes so that the yellow
(positive?) side of the top plane is facing upwards on the screen and the
yellow side of the right plane is facing the right side of the screen. This will allow us easier use of the datum
planes when assembling, orienting or manipulating this part. While this may not be necessary for some
parts, it may be incredibly useful later on when assembling components as one
tries to figure out which datum is which and belongs to which part.
With the planes oriented as described, create a rectangular cross section that extends 1.000” on either side of the right plane and .250” on either side of the top plane. Extrude to a depth of 1.500” on one side and 7.500” on the other.
Hopefully when finished, your shape should look like that on the left.
Now we shall create three mounting holes to affix this
bracket to a pre-selected rotation stage; Newport 481-A. I will use the
conventions established in the screenshot on the left for the remainder of this
document. Create a
standard hole for a 1/4-20 screw using the clearance option, with a counterbore
depth of .290”. For the primary
reference, use the broad surface on the yellow side of the top datum
plane. Use the right and front
datum planes as secondary references.
We want two holes on the left side .500” away from the red side of the
right plane, with one 1.000” away from the yellow side of the front and one 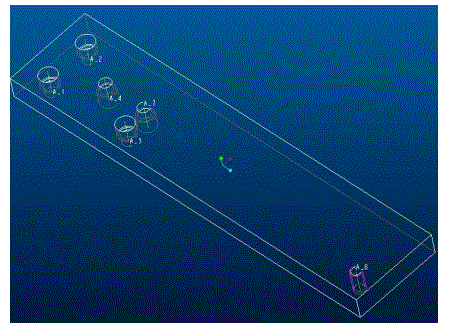 1.000” away from the red side of the
front. We want another hole .500” away
from the yellow side of the right plane and 1.000” away from the red side of
the front plane. Instead of generating
each hole individually, click on the
1.000” away from the red side of the
front. We want another hole .500” away
from the yellow side of the right plane and 1.000” away from the red side of
the front plane. Instead of generating
each hole individually, click on the ![]() button once all the parameters have been
specified to generate the current hole and use the same settings to create
another.
button once all the parameters have been
specified to generate the current hole and use the same settings to create
another.
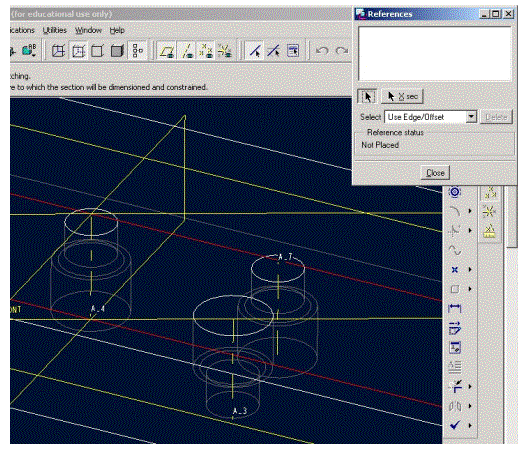
Now flip the part over so we’re looking at the red side of the top plane. Create a datum axis at the intersection of the front and right planes. Now create a hole with the same parameters as above (1/4-20 CLEAR and C’BORE Æ.290) using this axis as the primary reference. It should ask for a plane to serve as secondary reference; make sure this is the surface of the part on the red side of the top plane. This hole will allow the grating mount assembly to be attached and is therefore counterbored in the opposite direction as the rotation stage holes. We want another hole on this side of the part, spaced 1.000” from the yellow side of the front plane and 0.000” from the right plane. Make sure it has no countersink.
Create a 1/4-20 tapped hole with no counterbore but with a countersink. Thru All and Thru Thread should be selected. Place it at a distance of .500” from the surface parallel and farthest from the front plane and .500” from the surface on the red side of the right plane. Use the red side surface as primary reference; that will place the countersink on the side that will be mated to another manufactured part.
Your part should coincide with the image on the right.
 The hole
1” from front and 0” from right is going to be turned into an arc; that is, we will connect it to another hole
using a revolved cut. First we must
create the other hole, however. Insert/Datum/Plane. Select Through and choose the axis
at the intersection of the front and right planes, A4 in my
screenshots/part. Click Through again
but this time select the axis generated by the hole in the upper left corner
(when looking at the top [yellow side of top] of the part). Click Done and the plane should be
generated.
The hole
1” from front and 0” from right is going to be turned into an arc; that is, we will connect it to another hole
using a revolved cut. First we must
create the other hole, however. Insert/Datum/Plane. Select Through and choose the axis
at the intersection of the front and right planes, A4 in my
screenshots/part. Click Through again
but this time select the axis generated by the hole in the upper left corner
(when looking at the top [yellow side of top] of the part). Click Done and the plane should be
generated.
Insert/Datum/Point. We will sketch these points. Select the newly generated datum as our sketching plane. It will need you to choose a sketching view and a setup plane. Top would be an appropriate choice for both of these. I DO NOT RECOMMEND USING THE CHOSEN VIEW. At this point, I would rotate the part such that I can tell which side is which; a serviceable view has been chosen and is present at the left. Note that the part has not been placed. My recommendation is to select A4 (the intersection of front and right) as one reference and choose top as the other.
Once the references are chosen and it tells you that it is fully placed, close the window.
Begin sketching by creating a centerline parallel to A4. Constrain its distance to be 1.000” from
A4. Now generate two points on
this centerline roughly at the top and bottom (with respect to this
sketching view) surfaces of our part.
Using the collinear (![]() )
constraint, place the points on their respective surfaces.
)
constraint, place the points on their respective surfaces.
Click the checkmark and then Ok.
Insert/Datum/Axis/TwoPntsVtx and choose the two points we’ve just created. Done to create.
Now generate a hole from the red side of the top plane using this axis as primary reference and the red-side-surface as the planar reference. It should be like the others; 1/4-20 CLEAR AND C’BORE Æ .290”. It must not have a countersink or the slot will have problems being created.
Our next task is to create the revolved cut that will
connect these two holes and make the adjustable slot; this slot will allow varied positioning of the grating mount that
will sit on top. Feature/Create/Cut/Revolve/Done. OneSide/Done. It will then ask for a sketching plane. Choose the datum plane generated earlier; it
should be called DTM1. Make sure the arrow
is pointing towards 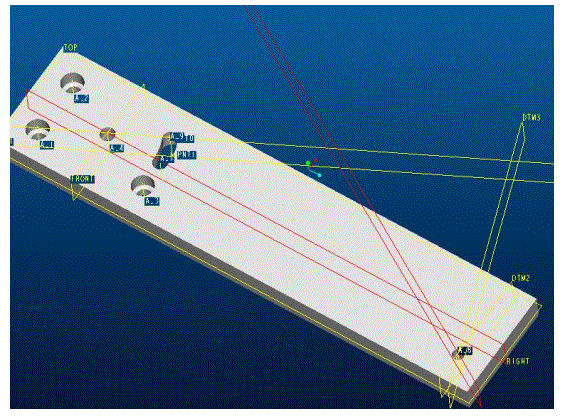 the other hole we wish to connect to.
It will need a Sketching view and setup plane. Top and Top are appropriate choices. Anything that works, really, as the view is inconsequential; we will move out of it as we did for sketching the datum points earlier. For references, I would again choose A4 and the top plane. Once placed, I would recommend turning the datum planes off, as the screen will become thoroughly crowded here shortly. Zoom in on the hole that is located on the DTM1 plane. It should be easiest to draw the outline looking along the normal to the DTM1 plane. However, when aligning, I recommend looking down the axis of the hole we are trying to draw the outline of. It is also quite helpful to select the curve first and then the vertex. You will have to sacrifice some constraints; I would recommend discarding the horizontal line constraints.
Before exiting the sketcher, we need to define the axis of revolution. From the little I know, this must be a centerline. Create a centerline along the A4 axis. While it is selected, click and hold the right mouse button. There should be an option to make that the axis of revolution. Click the checkmark indicating the sketch is complete.
Make sure the arrow is pointing towards the area to be
removed, as the dialogue text should say.
It will then ask for the distance to be revolved; we want to revolve up to a plane. Click done and then select the
right datum plane. The next
question can be slightly confusing; when
the plane is chosen, it is possible that you may want it revolved to the
nearest intersection with the plane in the direction 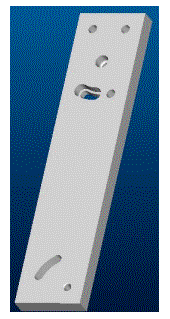 we chose before entering the sketcher. Or it may be that you want to skip the first
intersection with the plane and revolve until it hits the plane again. In any case, make sure the red arrow is
pointing towards the two holes we wish to connect with this slot. Click Ok and Ok to generate the cut. Your part should look like the picture on
the right.
we chose before entering the sketcher. Or it may be that you want to skip the first
intersection with the plane and revolve until it hits the plane again. In any case, make sure the red arrow is
pointing towards the two holes we wish to connect with this slot. Click Ok and Ok to generate the cut. Your part should look like the picture on
the right.
We need to create one more slot, though this time there will be no counterbore. First, Insert/Datum/Plane/Through and select the axis located at the treaded hole at the “far end” of the part. Second, make it parallel to the front datum plane. Click done. We will need two more datum planes, both through the axis of the threaded hole. One should be offset 20° from the newly created plane passing through the threaded hole axis. The other should be 60°. When done they should look like the picture above.
On each of these planes, sketch two points 1.000” inch away from the threaded axis. Create datum axes for each pair of points. From the yellow side surface, create holes along each axis that are clearance for 1/4-20 screws, extend through the object and have a countersink. Follow the same procedure described above for extending these holes into arcs.
The part is now complete. File/Save/[enter].
The part as generated by the author is here (~211KB).
David Sproles, 2002-08-06