Creating Your First Part: the Riser
We shall begin with a rather simple component; the dark red spacer. This component consists of four mounting slots, two on each side, and four holes placed in the top to allow the rotation stage to be mounted there.
With ProE opened, select file/set working directory. From there, choose the directory your parts will be stored in. From then on, anything generated by the program will be dumped into that directory.
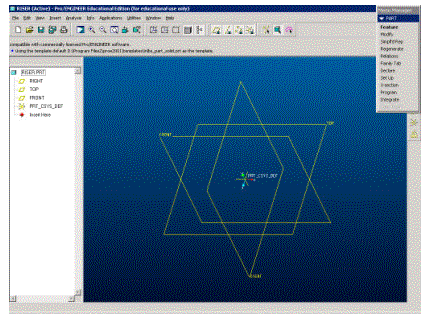 Selecting file/new,
choose the option of ‘part’ and enter a part name. You want it to be a solid, using the default
template; those options should come pre-selected. Once that is done, click ok. You will be presented with a rough approximation of the figure to
the right. The yellow rhombi are 3D representations
of datum planes. They can serve as
reference points for the pieces you will create. I will discuss their uses as we come across them. For now, suffice it to say that if it is not
selected, the plane will be yellow if you are on one side, red if you are on
the other. If you select the plane, it
will turn red if yellow or remain red if you are on the red side of the
plane. When rotating objects in ProE,
datum planes are not redrawn as the object is rotated, thus rotating them now
would be somewhat disorienting. If you
loose this viewpoint and would like to return to it, click
 ![]() and choose default.
and choose default.
On the left is the model tree. Objects in ProE are assembled as one might make a geometric construction; each following object will be dependant on the prior objects. Some may not be directly related; one might create two different holes using independent references from the datum planes. So long as a feature of one hole is not dependant on the other, it can be placed earlier or later in the model tree. However, a created feature dependant on a preexisting one cannot be placed before that preexisting feature.
On the right is a little window you will come to know very well. This menu manager will ask all the required questions to complete feature creation, model modification, etc. If you’d prefer to use the menus along the top to initiate the creation/modification of features or datum, that is possible only up to a point; the menu manager will be used in certain steps of the creation process to decide between different options.
Before describing further features of ProE, we will create a block with a single hole placed in it, allowing you some visual point of reference as you learn the 3D controls.
In the menu manager click feature/create/protrusion/extrude. Now click done. It should ask you if would like one or both sides. What will now occur is that you will be limited to a 2D sketching plane in which you will create the outline of a shape. This shape will then be extruded through a distance, generating a solid. One/both sides asks if you would like to extrude on one or both sides of the sketching plane. Both sides will allow you to sandwich the sketching plane (which will be one of the datum planes) in the middle of the solid. Choose both sides and click done. It will now ask for a sketching plane. This plane is brought parallel to the screen. In the sketcher, you will draw a 2D shape that will then be ‘extruded’ a certain depth (we shall specify later) into or out of the screen. Using the model tree on the left side, select the Right datum plane. It should then display a red arrow, indicating the direction the extrusion will take place. This is the first dimension if extruding on both sides or the only dimension if using one side. Click okay, as we don’t care which side of the plane it’s on. It will now ask for a sketching view. When creating features, I’ve found choosing these views is more of a hassle than anything else. If using the main datum planes, it will auto-define reference axes in the sketching frame according to these choices. However, if you’re placing a feature using a datum you’ve generated on your own as the sketching frame, it will not matter what view you choose, as you will have to choose references on your own. For now, simply select default.
This will shunt you to the sketcher. You will see the projection of the datum
planes, though any 3D effect will now be lost.
At this point, it is usually helpful to turn off these datum from the
display, as they contribute to visual clutter.
Using these buttons ![]() ,
one can respectively turn on/off the datum plane display, datum axis display,
datum points and coordinate system display.
I’ve not needed to use the coordinate systems at all in generating my
components and thus will not cover them.
,
one can respectively turn on/off the datum plane display, datum axis display,
datum points and coordinate system display.
I’ve not needed to use the coordinate systems at all in generating my
components and thus will not cover them.
At the top right of the screen, it will display the references chosen for this part. These are perfectly satisfactory references for now and we will not bother changing them. Click close on the small window to get it out of the way.
At first, the scale of magnification on the screen may be
dramatically off. We first may need to
reset that. To find out what scale the
screen is at, we will construct a centerline, an object used only as reference
in our sketch and not translated into actual material in the protrusion. Click the arrow to the right of the
slanted line in the tool-set on the right of the screen, displaying this: ![]() . Choose the dashed line on the
right. Place the line on the
(relatively) horizontal reference line by moving until the origin point beneath
your cursor snaps to an orange dashed line (reference line) in the main
sketcher window; now click.
Moving the cursor around will allow the line’s angle to be chosen. However, it will be useful to have a line
parallel to the reference line; at a point close to this, the line will snap
into place and either a small H or V will appear beside the to-be-placed
centerline. This means it is either
vertical or horizontal; these terms are
only valid in the sketcher with respect to the reference lines and do not apply
to global ideas of vertical and horizontal.
. Choose the dashed line on the
right. Place the line on the
(relatively) horizontal reference line by moving until the origin point beneath
your cursor snaps to an orange dashed line (reference line) in the main
sketcher window; now click.
Moving the cursor around will allow the line’s angle to be chosen. However, it will be useful to have a line
parallel to the reference line; at a point close to this, the line will snap
into place and either a small H or V will appear beside the to-be-placed
centerline. This means it is either
vertical or horizontal; these terms are
only valid in the sketcher with respect to the reference lines and do not apply
to global ideas of vertical and horizontal.
Once the line is generated (it should be in red) click once in a random part of the sketcher window using the middle button. This will exit the line-create mode. A word about the middle button; clicking this button can select bold-faced items in the menu manager, serve as an abort or escape button, etc. It is helpful to experiment with buttons in this program, as there are innumerable features that a few weeks barely have a chance to ferret out.
Next we desire to know the distance from the reference line
our new centerline is parallel to. Click
![]() . This button generates dimensions between
selected entities, be they points, arcs, curves, circles, planes, etc. This action of defining distances works as
follows. Once the button has been
clicked, select the first entity and then the second using the left mouse
button. Once you have chosen the
two entities you want to know the distance between, decide on a visual location
for the numeric display of the distance and click the middle button. You will still be in the mode for creating
dimensions, which you can tell by the shaded nature of the dimension
button. Exit this feature by clicking
the middle button again.
. This button generates dimensions between
selected entities, be they points, arcs, curves, circles, planes, etc. This action of defining distances works as
follows. Once the button has been
clicked, select the first entity and then the second using the left mouse
button. Once you have chosen the
two entities you want to know the distance between, decide on a visual location
for the numeric display of the distance and click the middle button. You will still be in the mode for creating
dimensions, which you can tell by the shaded nature of the dimension
button. Exit this feature by clicking
the middle button again.
The pointer button should now be shaded; you can change the value of the dimension of this first centerline. Double-click the dimension and change it to something useful for the part we will create; a value of 1.75, corresponding to 1.75 of the unit of measure you’d prefer to work in. Since our shop (and all of Josh Holt’s and David Sproles’ parts) use dimensions of inches, this symbolizes 1.75”. The display should now resize itself so that measures of distance are not so great.
Unfortunately, this resize probably positions both the main reference line and centerline in the wrong portions of the screen. To move things around, one always holds down the control button while using the mouse. Ctrl-Left allows one to change the zoom, Ctrl-Right allows one to move the object in the viewing plane and Ctrl-Middle allows for rotations. Rotation while making our first extrusion may be drastically confusing and is not suggested. The overlay of a 2D work-surface on a 3D object may be confusing; items that appear to be outside of the 2D plane are actually constrained to be within said plane. At this point, using Ctrl-Left and Ctrl-Right, adjust the screen so that the orange reference lines are in the center of the sketching screen, with the blue centerline on the right-hand side.
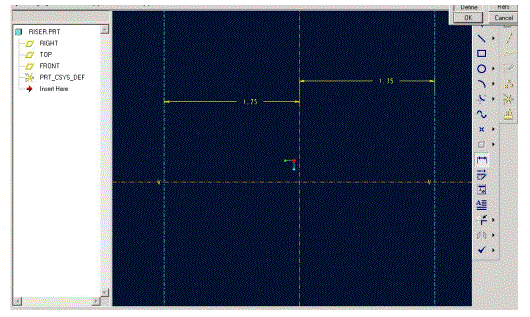 Using the same procedure as
described before, generate another centerline on the other side of the
orange reference line. When dimensioning the line, you may wish to choose both
blue lines for your dimension rather than the new centerline and the original
reference point. Your sketcher view
should look something like the screenshot on the right, perhaps with a
different dimensioning scheme chosen. A
word on dimensions; ProE will not allow anything to be over-constrained in the
sketcher. Try doing this now by
providing both distances from blue to the orange line as well as between both
blue. It will bring up a “Resolve
Sketch” window, allowing one or more “conflicting” constraints to be removed. In this case, they are not really
conflicting; they all point towards the same data in the same sketch. However, if one dimension is slightly off in
terms of tolerances, it implies that the other dimensions will inherit that
error. Hence the prohibition against
over-constraint. Remove either one the
dimensions applied to the second centerline.
Our next task will be to create the profile of the dark-red
component. Change to the line-segment
creation tool by choosing the solid line:
![]() . Now draw the rough shape described in the
picture below by clicking placement of lines, dragging to the next endpoint
and clicking again. Do not worry about
matching dimensions; avoid letting the small L# shapes appear though, as this
signifies that two lines are identical in length. The only two lines we need declared identical in length are those
that have a small L1 by them below.
When the shape is complete, to exit the line-creation mode click the
middle button.
. Now draw the rough shape described in the
picture below by clicking placement of lines, dragging to the next endpoint
and clicking again. Do not worry about
matching dimensions; avoid letting the small L# shapes appear though, as this
signifies that two lines are identical in length. The only two lines we need declared identical in length are those
that have a small L1 by them below.
When the shape is complete, to exit the line-creation mode click the
middle button.
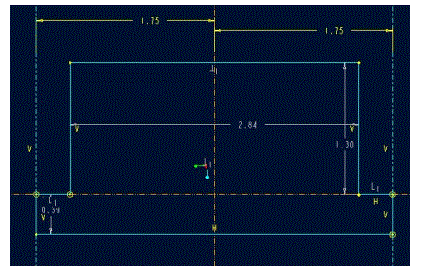
The dimensions in yellow are strong dimensions; they will be sacrificed last if an action on your part or on the part of the program requires some dimensions to be resized. The dimensions in gray are weak dimensions and cannot be deleted. They are necessary for the part to be created and are not necessarily the exact number listed. Note that weak dimensions are not created everywhere; only a sufficient number of dimensions are generated to define the shape at this point. Also note in the above picture the small gray L1’s above two line segments. This signifies a constraint that the line segments are of the same length. Constraints can be added or removed at will and are highly useful. We will use more of the constraint options later on.
Change the dimensions of the wings such that they are two squares with sides of 0.500 length. The upper portion should be 1.150 from the horizontal orange line and should be 2.500 wide. Since the L1 constraint exists, it should be centered. If that L1 is still in gray, make sure cursor mode is selected, select the L1 and then hold down the right mouse button. A selection menu should pop up. One of the options is “strong” which changes L1 from a weak to a strong dimension.
Our cross-section is now clearly defined. Click on the Checkmark button at the bottom of the right-hand tool window.
Once you’ve clicked on the checkmark signifying you are through sketching, you return to 3D mode. At this point, it will be useful to rotate the image, allowing us to see which direction the sketch is going to be extruded. To do this, hold down control and click-and-drag the middle button. This will allow for rotation. Move the cross-section around till you get a feel for where it is in 3-space and it is clear which way the red arrow is pointing. The menu manager will offer selections about extrusion. We wish for a 2-side blind, allowing us to specify depth from a the sketching plane on both sides for extrusion. After selecting done, it will ask for both dimensions. Both should be 1.75
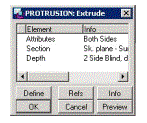 Once the dimensions have
been entered, we have the option of going back and changing things if we so
desire. If you realize that the sketch
was drawn incorrectly, at this point you can select the second item, “section”
and click define. It will then allow
you to modify the existing sketch. Any
of the sequence of choices we’ve gone through in defining this protrusion is
changeable from this point.
Click Ok to create the protrusion.
The menu bar along the top ![]() controls the display mode. From left to right, all lines displayed,
shaded hidden line, no hidden line, solid, model tree. Change these options if you’d like, to get a
feel for what the display does. I’d
suggest moving the object around, spinning it, etc in order to become familiar
with the controls.
controls the display mode. From left to right, all lines displayed,
shaded hidden line, no hidden line, solid, model tree. Change these options if you’d like, to get a
feel for what the display does. I’d
suggest moving the object around, spinning it, etc in order to become familiar
with the controls.
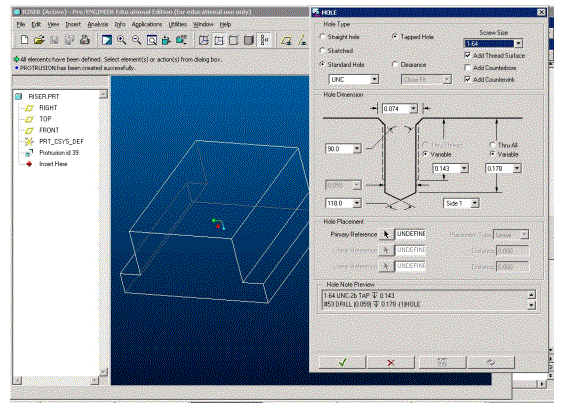 Now we will create a single
hole in the top of the object. From the
menu manager, feature/create/hole.
This should bring up the hole sub-window. We’d like a standard hole. In the top right is an option for screw size. Change this to the standard size used
on an optical table; 1/4-20. We
do want this to be a tapped hole, with thread surface and countersink. Since a component will be placed flush with
the top of the block, there is no need for a counterbore.
Before changing the parameters of the hole, we need to select its references. The primary reference should be the top side of the riser. To select this, click on the arrow icon to the right of “primary reference” and then click on the top surface of the block.
Next, if the datum planes are not visible, make them so. For the first linear reference, choose the right datum plane. If you can’t seem to select it using the model itself, the model tree should be useful. The second linear reference should be the top datum plane. These names are arbitrary and though they should be chosen to represent the top, front and right sides of the part, it is not necessary that they do so. The distance from the right datum plane should be 1.520 and from the top 1.000. If you’d like to see the placement of the hole and insure you’re on the right track, click on the glasses button along the bottom of the hole window. This will generate the hole without abortive errors or completing the generation process. If the dimensions are switch or incorrect and there are now random holes everywhere on the object, click in the main window and press the button along the top that looks like a windshield wiper. This will redraw everything, clearing out relict holes, lines, dimensions, etc. This is a very useful button; its shortcut is Ctrl-R.
Now we need to modify the depth of the hole and its tap. The total depth given as the right hand side dimension should be 1.000”. You must then hit the enter key or the change in dimension will not take place. Then change the thread depth to 0.750”
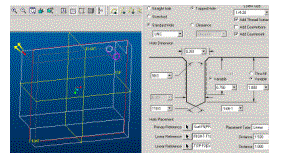
With this, the hole should be defined. It’s placement should look roughly like the picture on the right. When you are sure it’s in the right place, click on the checkmark to generate the hole.
Rather than generate 3 other independent holes with similar features, we will copy from this one hole to the other locations.
From the menu manager, feature/copy/mirror/select/dependant/done. Now either using the model tree or clicking on the hole itself in the main window, select the hole we’ve just created. Then click done in the menu manager or click the middle mouse button. You must click done again to signal the features have been chosen. Now select the top datum plane to mirror the feature about. It should auto-complete and generate the feature. Now you have two holes, with the second depending on the first. If we desire to change all four holes, now all we have to do is change the placement/threaddepth/etc on the original to whatever new value we want and then regenerate the model. We need to repeat this process, choosing both the original hole and the new copy and mirroring them around the front plane. Make sure that the copied features are dependant on the old features.
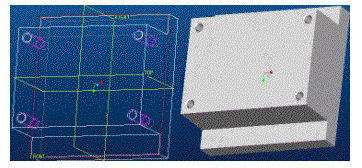 Your object should look
like one of the two snapshots on the left.
Next we need to make the slots in the wings. From the menu manager, feature/create/cut/extrude/done. One side/done. Rather than select a datum for a sketching
plane, make sure the datum are turned off and select one of the upper
surfaces of the wings. Make sure
the direction of the red arrow is pointing into the material; otherwise the cut
won’t intersect the part and our time is wasted. If the arrow is the wrong direction, click 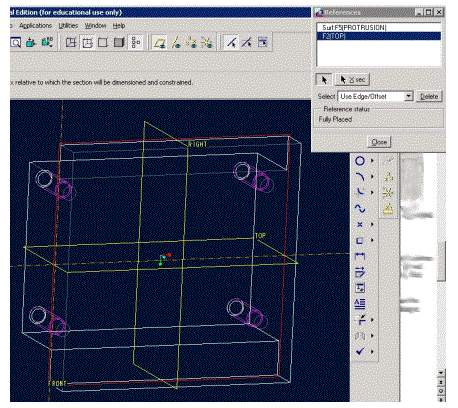 flip. For a sketching view, select default.
The auto-chosen references are probably not the ones we’d like as it did in the picture on the left; it would be most convenient if we could create one slot and then generate the others via mirroring. At this point, reengage the datum planes and tilt the model slightly so it will be possible to know what one is looking at.
Preferably we’d like our dimensions referenced from the
top and right datum planes. If
there are references other than those in the window, remove them. To add the correct references, click on the
arrow and choose the datum plane desired.
Once the correct references have been chosen, click on ![]() to reorient the sketching plane level
with the surface of the screen.
to reorient the sketching plane level
with the surface of the screen.
Holding down control and keeping the mouse still, click once and let go near the top left corner of the portion we’ll be sketching the slot onto. Now drag the window around that portion and click again. You can let go of control. This is a fast way to zoom in on small sections of the drawing.
Now click on the solid square button in the
right-hand toolbar and create a rectangle that fits inside the half-wing
we’re sketching into. The exact
dimensions don’t matter yet, as we’re still making out constructions. Using the arrow, select both of the
smaller legs of the rectangle (by holding down shift) and then click and
hold the right mouse button. This will
allow us to change these to construction lines. We want the ends to be rounded, not
square. Click on ![]() to create a point. Attempt to place the cursor in the middle
of the small legs of the rectangle; the cursor should snap to the middle
and a small M will appear indicating this is a midpoint.
to create a point. Attempt to place the cursor in the middle
of the small legs of the rectangle; the cursor should snap to the middle
and a small M will appear indicating this is a midpoint.
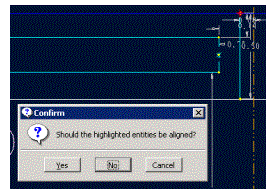
Next, create a solid line from the top of the wing to the bottom, just outside the rectangle. You won’t be able to snap the ends of the line to the correct portions of the wing, so just try and get close. When the line segment has been placed and you are done creating segments, if the endpoints were close enough to the top and bottom of the wing a window should pop up as shown on left. The alignment question is important; normally too many points attached like this can be a problem when establishing constraints internal to the sketch. In this case though, we want both ends of the line segment to be aligned. Once that is done, return to the arrow cursor and change this line to a construction line. Place a midpoint in the center of it as well.
 Now we will generate a
constraint. Click
 ![]() which will bring up the constraints box as
shown on the right. Click the button
circled in red, as this causes points to merge. Now click both midpoints.
They should join. Change the
distance from the orange line to the side of the rectangle to 0.250 and change
the width of the rectangle to 0.270.
This will be denoted not as an exact measurement on technical drawings
for the creation of this part, but as “CLEAR 1/4-20” and therefore we only need
approximate the dimensions of the slot with close attention to the endpoints. Now change the distance from the far side
of the rectangle to the end of the part to 0.250. This may require creating a dimension.
which will bring up the constraints box as
shown on the right. Click the button
circled in red, as this causes points to merge. Now click both midpoints.
They should join. Change the
distance from the orange line to the side of the rectangle to 0.250 and change
the width of the rectangle to 0.270.
This will be denoted not as an exact measurement on technical drawings
for the creation of this part, but as “CLEAR 1/4-20” and therefore we only need
approximate the dimensions of the slot with close attention to the endpoints. Now change the distance from the far side
of the rectangle to the end of the part to 0.250. This may require creating a dimension.
Now we must create the half-circular arcs at both ends of
the slot. To do this, select the arc
tool which is circled in red: ![]() . The steps are listed in the text-display
above the sketching screen; first
select a center-point for the arc (the midpoint on one side of the rectangle),
then select the starting point (one end of the two sides of the rectangle) and
then choose the end point (the endpoint on the other side of the rectangle. It was my experience that it does not
want to snap that last point into place;
do not place it too close as you will want to use the point-merge
feature used to align the two endpoints.
. The steps are listed in the text-display
above the sketching screen; first
select a center-point for the arc (the midpoint on one side of the rectangle),
then select the starting point (one end of the two sides of the rectangle) and
then choose the end point (the endpoint on the other side of the rectangle. It was my experience that it does not
want to snap that last point into place;
do not place it too close as you will want to use the point-merge
feature used to align the two endpoints.
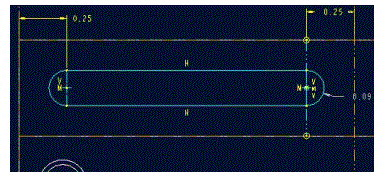
Your final cross-section for cutting should look like that on the left. Once established, click the checkmark to signify the sketch is complete.
It will ask which side of the extrusion should be removed. Make sure the arrow is pointing in the correct direction and click ok.
Since we want this slot to extend through the entire wing, select through all rather than blind.
Click ok and the cut will be generated.
Now using the same procedure we used in creating the dependant holes, copy the slots (feature/copy/mirror/select/dependant/done, select features, done/done, select mirroring datum) to the other wing positions.
One final thing needs to be added to our part; datum axes. These will allow us to align the part quickly to other parts, though datum are not always necessary for assembling parts. First we will need to generate points at the center of the curved ends of the slots. Then we will generate axes through all pairs of points. Begin by clicking from the above menu Insert/Datum/Point. From the menu manager, click At Center. Now select the curved edges that form the top and bottom edges on both ends of the slots. Each slot has 4 curves, making a total of 16 lines necessary to be selected. When all curves are selected, click Done and Done. Now would be a good time to grow familiar with a keyboard shortcut; this will allow the generation of axes much faster that actually running through the menu each time. Alt-i/d/[return]/x corresponds to Insert/Datum/Axis. From the menu manager, click “Two Pnt/Vtx.” Select a pair of points and click done and done. Repeat until all axes are created. One more axis may be useful for placement of the rotation stage; Insert/Datum/Axis and from the menu manager Two Planes. Select the Top and Right planes and an axis should be created in the center of the part. Since we extruded this part symmetrically about these planes, this should be the center. The rotation stage will have an axis at this location as well, which should allow for swift assembling later.
The riser is complete. File/save/[enter].
The part as generated by the author is here (~146KB).
David Sproles, 2002-08-06